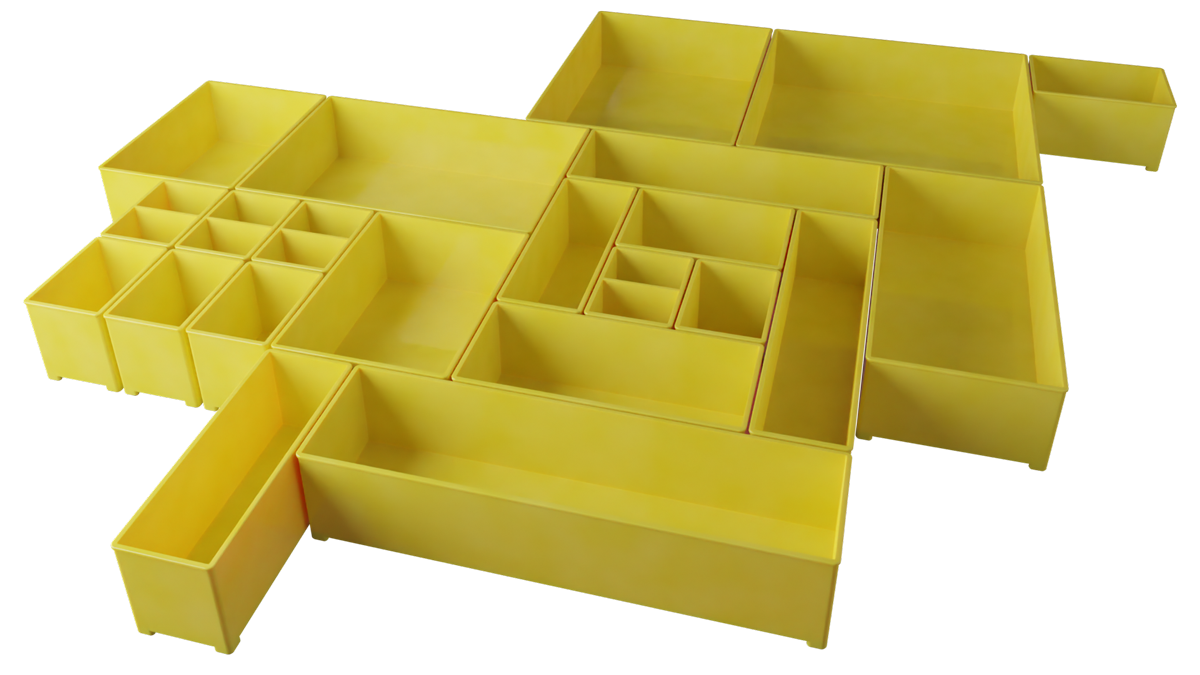
I've designed these 3D printable replacement bins for the Stanley® 25 Compartment Organizers so that you can have as many as you need in any size you need!
Custom Bins for Small Parts
take control of your storage
Every maker knows there's no such thing as too much storage. Finding customizable, scalable, cost-effective storage solutions is always a challenge, and while the Stanley® 25 Compartment Organizer 014725R comes close, it's only available with a single assortment of a few bin sizes. If you're storing a lot of small parts, you will ultimately need more of some sizes or perhaps completely custom sizes or speciality bins for specific hard-to-store items (I'm planning to post some soon, e.g., Nixie Tube storage).
The solution? Print your own!
Disclaimer: I am in no way, shape, or form associated with Stanley® Black & Decker, Inc. I created these designs from scratch and am merely a happy user of the organizers.
Filaments and Print Settings
These bins are rather robust with 1.5-mm thick walls, so they should be forgiving with different types of plastic. I generally print these with PLA since it's always on hand and comes in the color I want, and they've stood up to my normal abuse. That said, feel free to print these in PLA, ABS, PETG, or something exotic if you're feeling fun.
Due to the small features used to locate the feet when gluing (see Assembly), a 0.40-mm or smaller nozzle will yield the best results.
Standard 0.20-mm layer height is recommended.
A bonus of making these yourself is that you can print them in different colors to color code your storage!
If you want to match the original Stanley® yellow, I have found the Coex LLC Taxicab Yellow PLA to be visually indistinguisable from the stock bins.
Sizes and Downloads
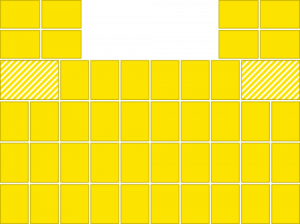
The organizer is divided into a grid of 48 rectangles (see note below). The options for this custom bin design are labeled by grid size. For example, a 1x2 bin is one rectangle wide and two rectangles high. Because the grid is rectangular and not square, a 1x2 bin and 2x1 bin are not the same.
There are two caveats to the grid layout:
The two striped, 2x1 areas in the diagram that cannot be subdivided into single 1x1 bins due to the way the Stanley® is designed. A larger bin, such as a 3x1 or 2x2 can include this striped region, but it cannot be split.
The two peninsulas at the top of the diagram that surround the organizer's handle are rotated 90 degrees, so while they can each be filled with 1x1, 1x2, 2x1, or 2x2 bins, they cannot be joined with the rest of the organizer unless using a custom bin to account for the geometry transition.
Some assembly required! Be sure to also download the feet. The downloaded file is one set of four feet, and you will need to print one set for each bin. See the assembly section for how to put the bins together.
| Grid Size | Download Link | Cavity (Width x Height x Depth) | Special Features |
|---|---|---|---|
| 1 x 1 | Download | 35.00 x 24.25 x 39.50 mm | 2 cavities, R 10 mm filleted bottom |
| 1 x 1 | Download | 35.00 x 50.00 x 39.50 mm | |
| 1 x 2 | Download | 35.00 x 105.00 x 39.50 mm | |
| 1 x 3 | Download | 35.00 x 160.00 x 39.50 mm | |
| 2 x 1 | Download | 75.00 x 50.00 x 39.50 mm | |
| 2 x 2 | Download | 75.00 x 105.00 x 39.50 mm | |
| 2 x 3 | Download | 75.00 x 160.00 x 39.50 mm | |
| 3 x 1 | Download | 115.00 x 50.00 x 39.50 mm | |
| 3 x 2 | Download | 115.00 x 105.00 x 39.50 mm | |
| 3 x 3 | Download | 115.00 x 160.00 x 39.50 mm | |
| 4 x 1 | Download | 155.00 x 50.00 x 39.50 mm | |
| 4 x 2 | Download | 155.00 x 105.00 x 39.50 mm | |
| 4 x 3 | Download | 155.00 x 160.00 x 39.50 mm | |
| 5 x 1 | Download | 195.00 x 50.00 x 39.50 mm | |
| 5 x 2 | Download | 195.00 x 105.00 x 39.50 mm | |
| 5 x 3 | Download | 195.00 x 160.00 x 39.50 mm | |
| Feet | Download | Set of four feet for one bin |
Download the entire collection
Assembly
After printed both the shells and feet (one set of four per shell), you only need to glue them together before they're ready to use.
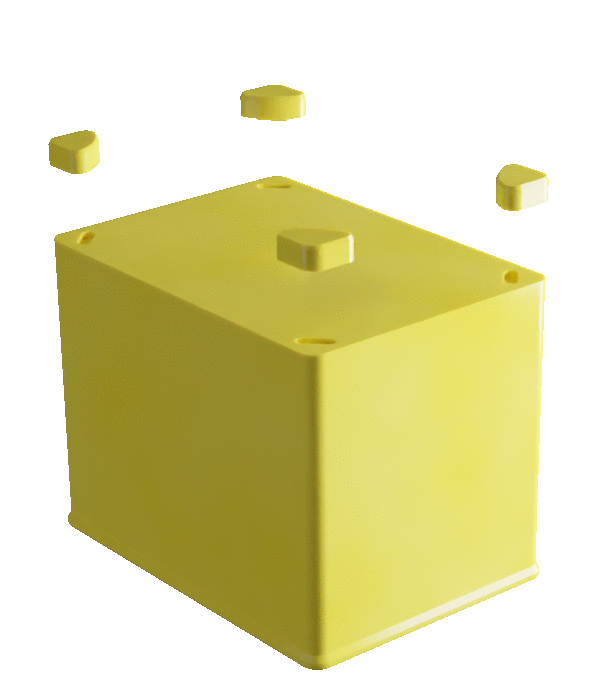
The topic of what glue is best for which plastic is beyond the scope of this page, so if you have a favorite glue for whatever plastic you used, feel free to use it. For PLA, I have found cyanoacrylate (CA) glue to be sufficiently durable. If using CA glue, do not use accelerator, a.k.a. kicker. You may need to wiggle the foot into position, and accelerator will cure the glue too quickly.
To glue on your feet, set the box upside down on a protected work surface and place a drop of glue into each of the four foot sockets. Preferably using tweezers or gloved fingers to prevent accidental finger-gluing, position a foot onto each corner with the 90-degree angle pointing outward and wiggle the foot into the socket. Press the foot firmly down and inward towards the center of the box to help align it nicely and make a good bond. The feet do not need to be perfectly aligned, but the better you can wiggle them into alignment with the corners, the better they will look. Let cure before using to avoid accentally gluing a box into your organizer!